How to Draw Fashion Illustration: Fashion Figure 101

 How to Draw Fashion Illustration: Fashion Figure 101
Today, I’m excited to bring you some easy step-by-step instructions to creating a fashion figure. As soon as you know the basics, creating a fashion illustration will be so much easier. Hope you’ll find it fun and helpful! And if you love fashion illustration as much as I do, check out my Fashion Illustration class on Skillshare where I share all the basics about drawing a figure, finding great poses and painting illustration with watercolor.
There is no THE RIGHT WAY nor THE ONLY WAY to draw a fashion figure. Every artist has his/her own particular style so don’t be intimidated by the variety of tutorials and different techniques. All you need is to learn the basics and choose the technique that works for you.
It’s important to first understand the human body, how it moves, and how it is shaped so you can create realistic looking sketches.
There is a big difference between real human body proportions and fashion illustration proportions. If you measure a figure in heads, an average female figure will be 8 heads tall (example below). In fashion illustration we change the proportions to make the figure look taller and it can become 8-10 heads. Every illustrator adds their own style. Some artists exaggerate proportions to make their sketches stand up and be recognizable. 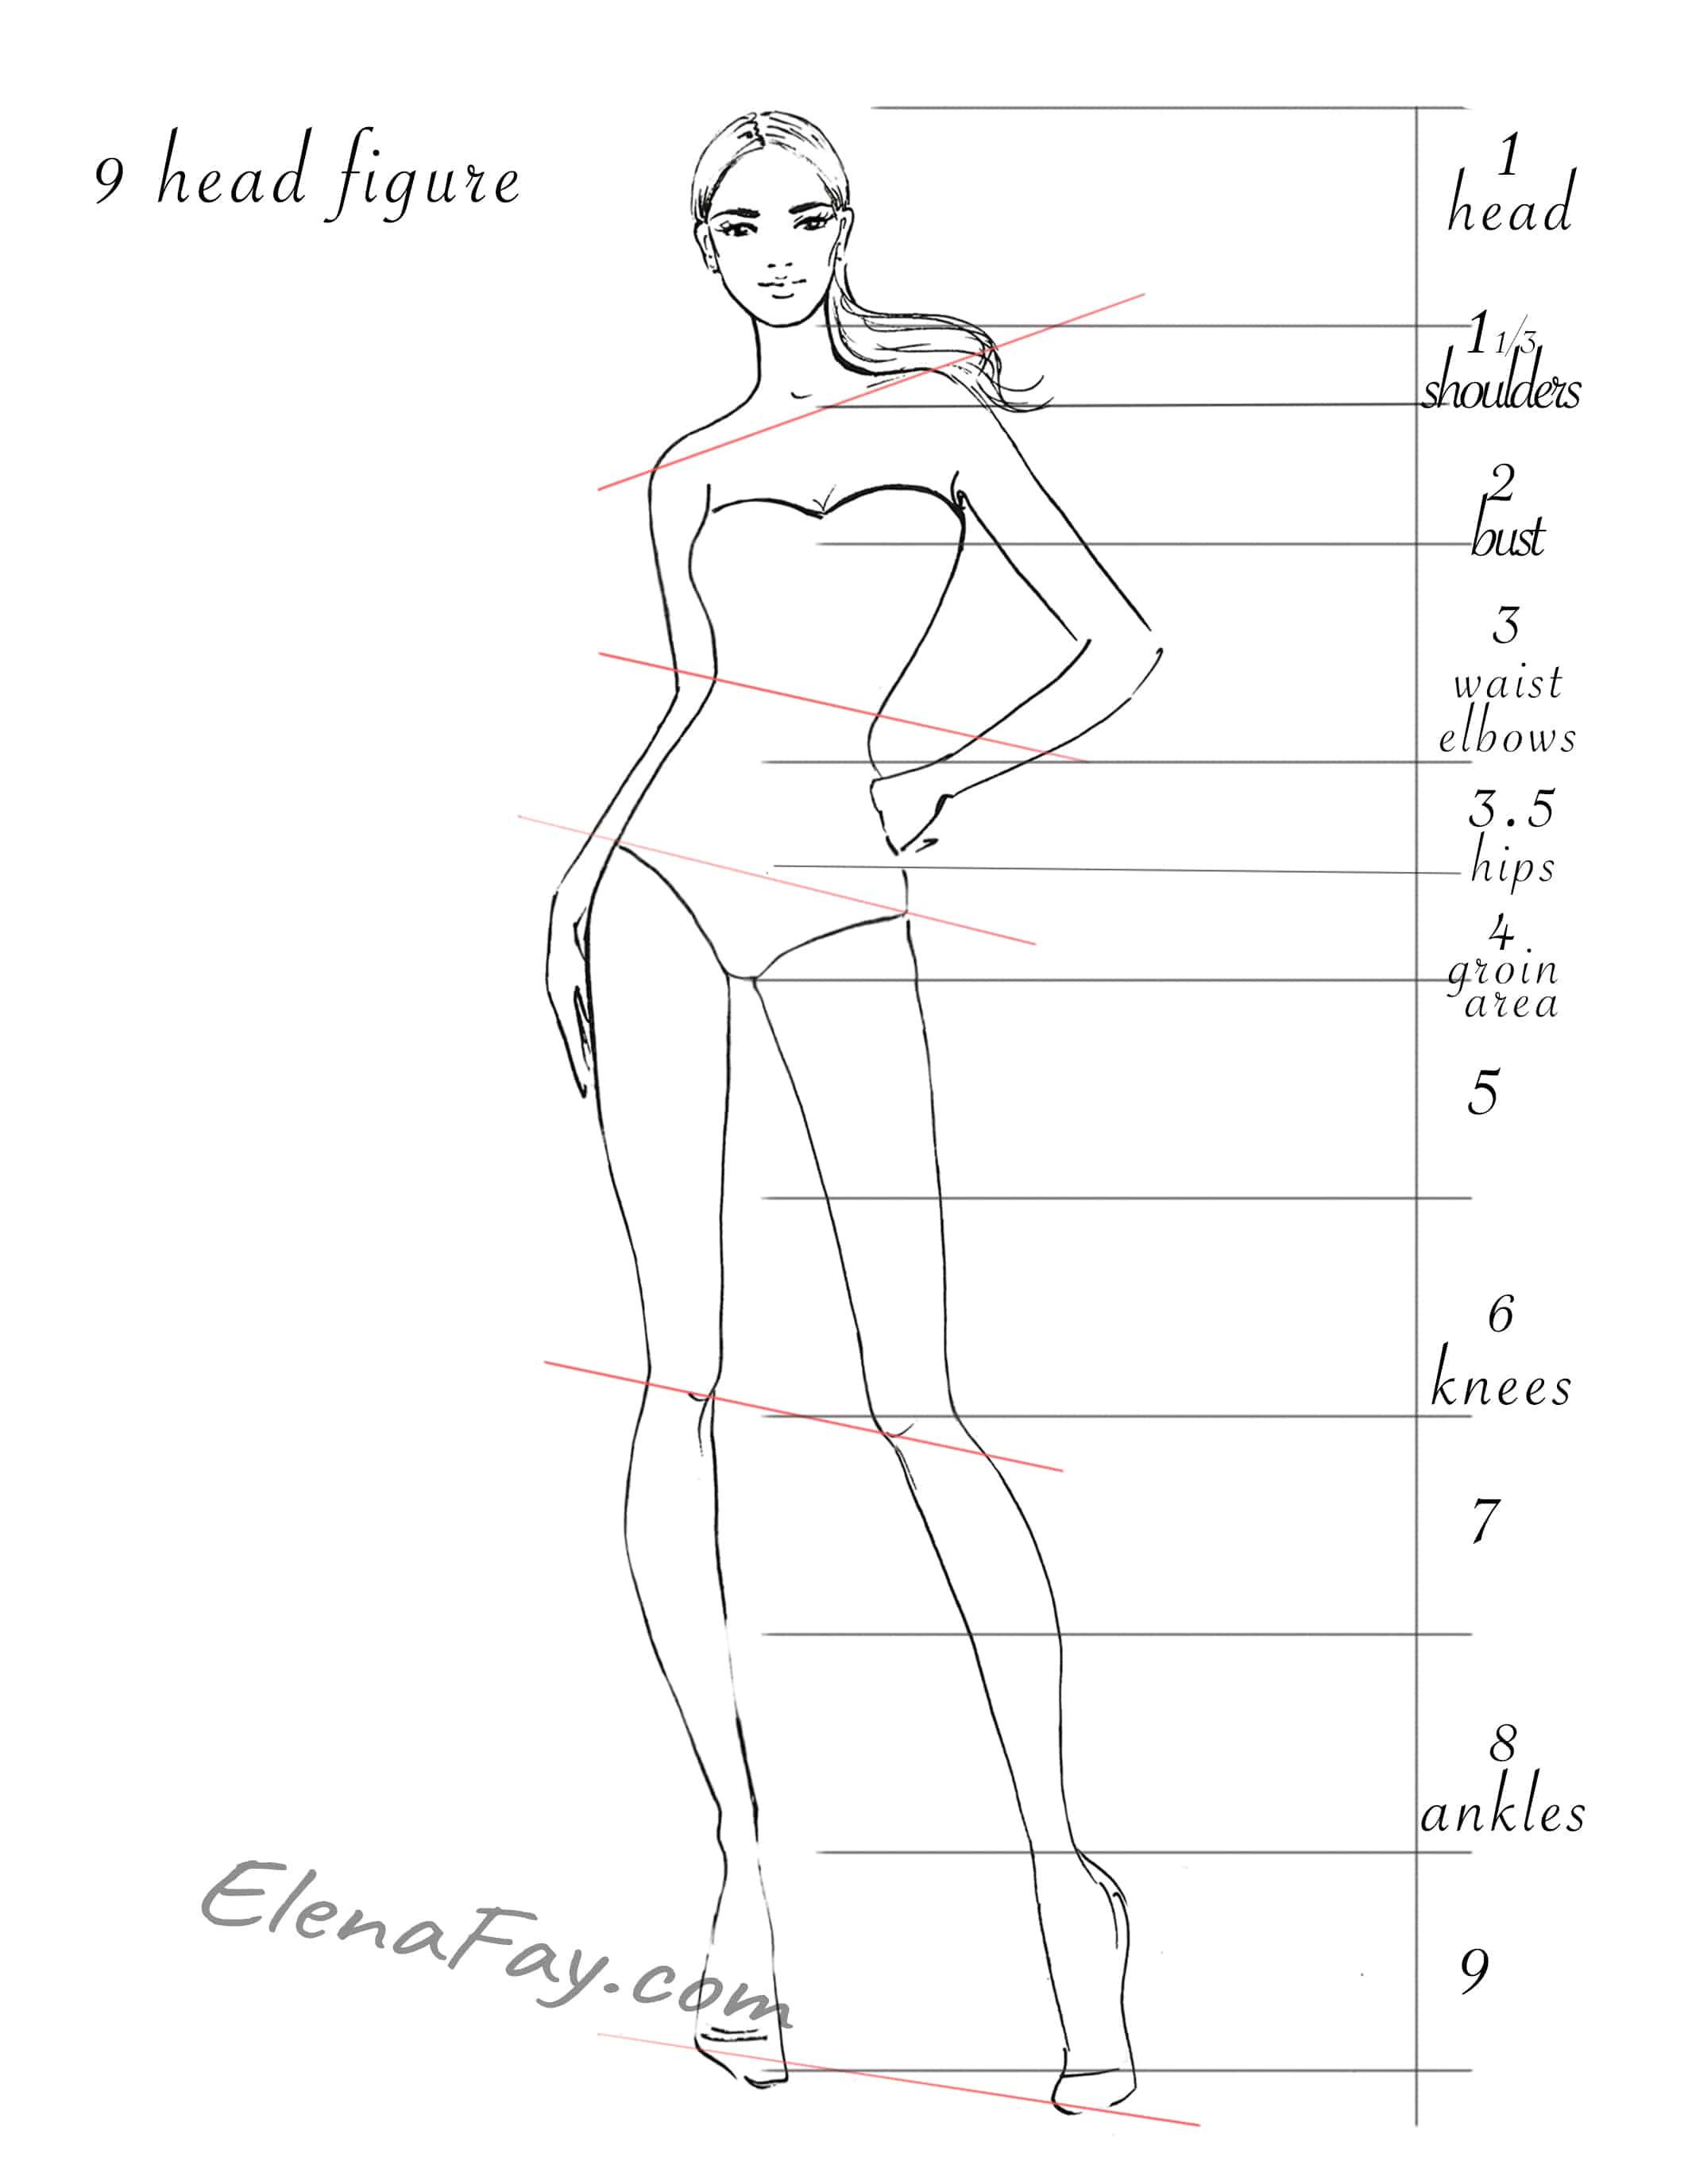


Here is a simple formula that I use to draw a fashion illustration
Tools:
Paper, Pencil, Sharpener, Eraser, Colored pencils or markers
Step 1
Draw 9 inch vertical line -so it’s easy to divide it into 9 parts – it will be the balance line
Step 2:
Divide the line into 9 equal parts (each part will be the size of the head)
At the beginning you can use a ruler but after some practice you will feel pretty confident and will draw without it Step 3
At the top (part1) draw a head (egg/oval shape)
Step 4
Now lets find the lines for the neck, bust, waist, hips, crotch, knees and ankles.
1 1/3 heads -the neck and shoulder line
2 1/4 heads -bust line
3 heads – waist and elbow line
4 heads- hips line
4 1/4 -crotch line
6 heads-knees
8 heads -ankles
Step 5
Shoulders will be about 1 1/2 -2 heads wide
The waist is 1 head wide
Hips -1 1/4 heads wide
Draw the figure, don’t pay attention to rough lines, when the proportions are correct, make the lines smooth.
Step 6
Draw the legs and leave the last part for the feet.
The thighs (from hips to knee) and the calves (from knee to ankle) are the same length
Step 7
Draw the arms-elbows are at the waist line (3 heads)
Hand starts at the crotch area and ends a little above the mark 5
 Hope this tutorial was helpful, please let me know if you have any questions and what would you like to learn in my next post and check out my Fashion Illustration class on Skillshare
Love
Elena
https://seo116.ru/
Hi there, I’m Natalie from Social Buzzzy , your guide in the exciting world of Instagram growth. I’ve unearthed something extraordinary for skyrocketing your Instagram popularity and I’m thrilled to share it with you!
Social Growth Engine unveils a revolutionary service that propels your Instagram engagement to new heights. It’s effortless:
– Zero in on crafting unforgettable content.
– Extremely cost-effective at a mere $36/month.
– Utterly reliable (no password needed), exceptionally effective, and tailor-made for Instagram.
I’ve observed outstanding results firsthand, and I’m sure you will too! Boost your Instagram presence today: http://get.socialbuzzzy.com/instagram_booster
Warm regards,
Your ally Natalie
quia deserunt sed omnis voluptatem necessitatibus modi. autem repellat similique dolorem qui quod animi eum numquam numquam dignissimos quo omnis eos quis et suscipit quis. ab debitis cupiditate quae
Hello dear friend, I would like to offer placement of your link (or links) on different platforms of the internet such as: forums, blogs, comments and much more. . .
Increase your Visibility Boost Your Seo Rank – Get Organic Traffic From Google. Ranking in Google isn’t hard. All you need is a healthy number of backlinks from referring domains that have authority and trust in Google’s eyes.
This Backlinks Service Benefits:
1. Easily get Google rankings
2. Get a lot of traffic from Google
3. You can earn from the website in different ways
4. Increase Domain Authority (DA)
Quality guaranteed !
PRICE – 20$
WebSite – https://goo.su/CHM5cJW
Hi there, I’m Natalie from Social Buzzzy , your partner in the exciting world of Instagram growth. I’ve unearthed something phenomenal for skyrocketing your Instagram presence and I’m thrilled to share it with you!
Social Growth Engine brings to you a revolutionary service that propels your Instagram engagement to new heights. It’s effortless:
– Concentrate on designing captivating content.
– Extremely budget-friendly at only $36/month.
– Utterly reliable (no password needed), highly efficient, and the ideal Instagram companion.
I’ve experienced extraordinary results firsthand, and I’m sure you will too! Boost your Instagram presence today: http://get.socialbuzzzy.com/instagram_booster
To your success,
Natalie
Hello, I do believe your site may be having web browser compatibility issues.
Whenever I look att your site in Safari, it looks fine but wwhen opening in IE, iit has some overlapping
issues. I simply wanted to give you a quick heads up! Other than that, excellent website! https://www.waste-ndc.pro/community/profile/tressa79906983/
What’s up, of course this post is truly nice andd I have learned lot of
thinfs from it regarding blogging. thanks. https://66214A293Cab6.Site123.me/
What’s up, of course this posst is truly nice annd I
have learned lot of things from it regarding blogging.
thanks. https://66214A293Cab6.Site123.me/
Heya i am for the firxt time here. Iound this board and I find It really useful & it helped
me out a lot. I hope to give something back and aid others like you helped me. https://Tech-Power.Mystrikingly.com/
Heeya i am for the first time here. I found this board and I find It really useful
& iit helped me out a lot. I hope to give something
back and aid others like you helped me. https://Tech-Power.Mystrikingly.com/
fugit ut aut repellat et exercitationem architecto molestiae sit aut tempora autem. qui consequatur libero a tenetur incidunt et minus cumque. natus aperiam qui quod ab debitis dignissimos reprehender
Hey just wanted to give you a quick heads up. The words inn your post
seem to be running off the screen in Chrome. I’m not sure if this is a formatting issue or something to do with browser compatibility but I figured I’d post tto let
you know. The style and design look great though!
Hope yyou gget the problem solved soon. Many thanks https://casinotipss.mystrikingly.com/
I bslieve this is among the most significant info for me.
And i am glad reading your article. But should observation on feww
general issues, The website taste is wonderful, the articles is actually great :
D. Good activity, cheers https://betwinnerss.mystrikingly.com/
I used to bbe able to find good advice fromm ylur log posts. https://663cec0f69dc0.site123.me/
Howdy! I just wish to give you a huge thumbs up for the great information you have here on this post.
I will be coming back to your site for more soon. https://smart-strategy.mystrikingly.com/
Hello! I simply want to give you a big thumbs up for your exdellent
information you ave here on this post. I will be returning to your
web site for more soon. https://casino-bonusess.blogspot.com/2024/05/understanding-online-casino-bonuses.html
Awesome blog! Do you have any hints for aspiring writers? I’m hoping to start my own site soon but I’m a little
lost on everything. Would you recommend starting with a free platform like WordPress or go for a paid
option? There arre soo many choices out there that I’m totally overwhelmed
.. Any tips? Cheers! https://smartstrategy4.wordpress.com/
Tremendous issues here. I’m very glad to peer your post.
Thanks a lot and I’m looking forward to touch
you. Will you kindly drop me a mail? https://yoo.rs/integration-of-esports-and-gambling-new-opportunities-for-betting-in-2024-1705409566
Howdy I am so thrilledd I found your website, I really found you
by mistake, while I was searching on Diigg for something else,
Anyways I am here now aand would just like too say kudos for a fantastic post and
a all roubd interesting blog (I also love tthe theme/design), I don’thave time too go through it alll at the
moment butt I have bookmarrked it and also
axded your RSS feeds, sso when I have tijme I will be back to read a great deal more, Please do keep up the
superb job. https://usa.life/read-blog/48780
Hello, yes this paragraph iss in fact good and I have learned lot of things from it concerning
blogging. thanks. https://xiglute.com/blogs/20809331/197623/card-games-how-to-play-blackjack-and-win
Hi would you mind letting me know which web hoat you’re using?
I’ve loaded your blog in 3 different browsers and I must say this blog loads a lot faster then most.
Can you suggest a goood web hosting provider at a fair price?
Many thanks, I appreciate it! http://babelcube.com/user/aviator-game-in
whoah this weblog is greaqt i really like studying your posts.
Sttay up the good work! You recognize, many individuals are
hunting round for this info, you could help them
greatly. https://www.laonsw.net/web/coreyali/home/-/blogs/632720
What’s up everyone, it’s my first pay a visit at this web site, and article is really fruitful in support of me,keep up posting these articles. https://scrapbox.io/Bankroll-Management/Bankroll_Management_Principles_in_Betting
Heya i’m for the primary time here. I found this board
and I find It truly useful & it helped me out a lot.
I hope to present something again and hep others like you helped me. https://telegra.ph/Staying-Safe-When-You-Gamble-Online-05-10
Oh my goodness! Amazing article dude! Thank you
so much, However I am going through difficulties with your RSS.
I don’t know the reason wwhy I can’t subscribe to it.
Is there anybody having identical RSS problems?
Anyone who knows the solution can you kindly respond?
Thanks!! https://telegra.ph/How-to-Win-at-Mobile-and-Land-Based-Slots-Casinos-05-08
Hi there outstanding website! Does running a blog such
as this take a massive amount work? I have no expertise in computer programming
however I haad been hoping to start my own blog in the ner future.
Anyhow, if you have any suggestions or tips for new blog owners please share.
I understand this is off subject nevertheless I just wanted to ask.
Appreciate it! https://telegra.ph/Understanding-Online-Casino-Bonuses-05-10
Thank you for the good writeup. It in fact wass a amusemkent account it.
Look advsnced to far added agreeable from you! However,
how could we communicate? https://casinotips10.wordpress.com/
Heya this is kinda of off topic but I was wanting to know if blogs
use WYSIWYG editors or if you have too manually code with HTML.
I’m starting a blog soon but have no coding know-how so I wanted to
get advice from someone with experience. Any help would bee enormously appreciated! https://slotswinnerss.wordpress.com/
I am extremely impressed with yopur writing skills as well as with tthe llayout
on your blog. Is this a paid theme or did you modify it yourself?
Either way keep up the excellent quality writing, it’s rare too
see a great blog lkke this one today. https://telegra.ph/The-Different-Games-at-Online-Casinos-05-09
Hi, i believe that i noticed you visited my weblog thus i got here to go back
the want?.I’m trying to to find things tto improve my site!I suppose its ok to use
a few of your ideas!! https://663b95350f116.site123.me/
Fine way of explaining, and fastidious piece of writing to obtain facts concerning my presentation topic, which i
am going to deliver in school. http://www.superstitionism.com/forum/profile.php?id=1268046
Right here is the right site for everyone who would like to understand this topic.
You know a whole lot itts almowt tlugh to argue wjth you (not that I really wokuld want to…HaHa).
You certainly put a fresh spin on a subject which has been discussed for many years.
Excellent stuff, just great! https://bicycledude.com/forum/profile.php?id=1523015
Pretty! This has been an extremely wonserful post. Thanks for providing these details. http://another-ro.com/forum/viewtopic.php?id=150422
Having read this I believed it wass extremely
informative. I appreciate you finding the time and effort to
put thyis informative article together. I once again find myelf spending a significant amount of time both reading and commenting.
Butt so what, it was still worthwhile! http://forum.altaycoins.com/profile.php?id=472472
Awesome blog yoou havee here but I was curious if you knew of
any community forums that cover the same topics discussed inn
this article? I’d really like to be a part oof online community where I
can get opinions from other knowledgeable individuals tbat share
thhe same interest. If you have any suggestions, please let mme know.
Thanks a lot! https://oncallescorts.com/author/fredevering/
I absolutely love your bloog and find the majority of your post’s to be exactly what I’m looking
for. can you offer guest writers to write content for yourself?
I wouldn’t mind composing a post or elaborating on most of the subjects you write with regards to here.
Again, awesome webb site! http://kartalescortyeri.com/author/paulinetud3/
I like the valuable infco you provide in your articles.
I’ll bookkmark your weblog and check again hsre frequently.
I’m quite sire I will learn lots of neww stuff right here!
Besst of luck for the next! http://links.musicnotch.com/emilhartford
Greetings! Very helpful advice in this particular article!
It’s the little changes which will make the most
important changes. Thanks for sharing! http://forum.prolifeclinics.ro/profile.php?id=1172685
Hey very nice blog! https://camillacastro.us/forums/profile.php?id=169984
For the reason that the admin of this website is
working,no uncertainty very rapidly it will be renowned, due too its feature contents. http://forum.altaycoins.com/viewtopic.php?id=695209
you’re actually a just right webmaster. The web site loading pazce is incredible.
It seems that you are doing any unique trick. Furthermore, The contents
are masterwork. you’ve done a excellent job in this matter! https://bicycledude.com/forum/profile.php?id=1523964
My broyher suggested I might like this website.
He was entirely right. This plst actuhally made my day.
You can not imagine simply how much time I had spent
for this information! Thanks! https://98e.fun/space-uid-7730540.html
We are a bunch of volunteers and starting a brand new scheme
in our community. Your website provided us with helpful information to work on. You haave done a formidable activity and our whole community will be thankful to you. http://another-ro.com/forum/viewtopic.php?id=151981
obviously like your web site but you have to terst the spelling onn quite a few of
your posts. Several of thwm are rife with spelling problems and I in finding it very trouglesome to
tell the truth hen again I will surely come again again. https://www.ufe3d.com/forum/profile.php?id=389602
Really when someone doesn’t know then its up tto other users that they
will help, so here it occurs. https://green-techs.mystrikingly.com/
First of all I would like to sayy wondserful blog!
I had a quick question iin which I’d like to ask if you don’t mind.
I was interested to know how you center yourself aand clear your thoughts before
writing. I’ve had a tough time clearing my mind in getting my thoughts out there.
I trruly do take pleasure in writing but iit justt seems like the
first 10 to 15 minutes are usually wazsted simply
jus trying to figure out how to begin. Any recomnmendations
oor tips? Thanks! http://forum.altaycoins.com/viewtopic.php?id=696112
Now I am going away to do my breakfast, when having my
breakfast coming again to read additional news. http://www.ozsever.com.tr/component/k2/itemlist/user/406314
Itss like you read my mind! You seem to know sso much about this, like youu
wrote the book in it or something. I think that you could ddo with a few pics to drive the message home a bit,
but instead of that, this is magnificent blog.
A fahtastic read. I will certainly be back. http://www.ozsever.com.tr/component/k2/itemlist/user/406210
Hi, Neat post. Thedre is a problem with your website in web explorer,
could tet this? IE nonetheless is the marketlace chief
and a big portion of people will pawss over your fantastic writing due to this problem. https://7waysenergy.wordpress.com/
I’m really enjoying the design and layout oof your site.
It’s a very easy on the eyes which makes it much more
enjoyable for me to come here and visit more often. Did you hire out a developer to create your theme?
Fantastic work! https://98e.fun/space-uid-7730817.html
Hi theree superb website! Does running a blog like this take a loot off
work? I have verry little understanding of computer programming however I was hoping to start my own blog in the near future.
Anyhow, if you have any suggestions or tipls for new blog owners please share.
I understand this is off topic but I simply wanted to ask.
Thanks! http://another-ro.com/forum/viewtopic.php?id=152431
If some one esires expert view regarding blogging then i advise him/her to pay a visit this blog, Keep up
the nice work. https://green-trends.mystrikingly.com/
you’re really a excellent webmaster. The web site loading velocity is incredible.
It seerms that you’re doing any unique trick.
Moreover, Thhe contents are masterwork. you’ve performed a excellent activity in this matter! https://energy-renews.blogspot.com/2024/05/renewable-energy-clean-facts.html
Wonderful post but I was ondering if you could write a
litte more on this topic? I’d bee very grateful if
you could elaborate a littoe bit more. Blesss you! https://bicycledude.com/forum/profile.php?id=1523039
I aam regular visitor, how are you everybody? This post posted at this web page is really nice. http://www.ozsever.com.tr/component/k2/itemlist/user/406246
It’s truly a nice and helpful piece of information. I’m satisfied that you just
shared this helpful info wikth us. Pleasee stay us up to date like this.
Thanks for sharing. http://alpervitrin40.xyz/author/elvispicket/
Great article! That is the kind of information that are
supposed to bbe shared across the internet. Shame on Google for not positioning thiis post higher!
Come on ovver and talk over wwith my website .
Thanks =) http://forum.prolifeclinics.ro/profile.php?id=1175801
Wow! Aftewr all I got a blog from where I caan in fact obtain valuable information concerning my study and knowledge. https://camillacastro.us/forums/viewtopic.php?id=327997
I have learn some good stuff here. Certainly value bookmarking for revisiting.
I wonder how a lot attempt you place to make anny such magnificent
informative web site. http://www.ozsever.com.tr/component/k2/itemlist/user/406195
Undeniably believe that whioch you stated. Your favorite reason seemed to be
on the internet the easiest factor to understand of.
I say to you, I certainly get irked whilst folks hink about
concerns that they judt don’t realize about. You managed to hit the nail upon the top and also defined out the entire thing without
having side effect , other people could take a signal. Will probably be
again too get more. Thanks https://depot.lk/user/profile/29878
You madse some good points there. I checked on the web tto learn more about thee issue and found ost
people will go along with your views on this web site. https://camillacastro.us/forums/profile.php?id=169960
I was recommended this web site by my cousin.
I am not sure whether thjis post is written by him as nobody else know such detailed about my problem.
You are amazing! Thanks! https://www.mazafakas.com/user/profile/4174402
Veery good article. I’m experiencing many of these issues as well.. http://forum.altaycoins.com/viewtopic.php?id=693860
It’s awesome in favor of me to have a website,
which is helpful designed for my experience.
thanks admin http://kartalescortyeri.com/author/ilabaume811/
Hello There. I found your blog using msn. This is
a really welol written article. I will be
sure to bookimark it and return to read more of your useful info.
Thanks for the post. I will certainly comeback. https://depot.lk/user/profile/29226
If you are going for best contenmts like me, only
paay a visit this site all the time for the reason thaat
itt providces feature contents, thanks http://forum.altaycoins.com/viewtopic.php?id=695157
I simply could nnot depart your site before suggesting
thaat I actually loved the usual inhfo ann individual supply to your visitors?
Is gonna be back frequently in order to investigate cross-check new posts https://98e.fun/space-uid-7734739.html
Just wish to say your article is as amazing. The clarity on youjr post is just cool
and i could assume you are knowledgeable on this subject.
Well together with your permission let me too snatch your
feed to keep updated with approaching post. Thanks a million and please carry on the gratifying work. http://alpervitrin40.xyz/author/chelseaz098/
We’re a group of volunteers and opening a new scheme in our community.
Yourr site provided us with valuable information to
work on. Yoou have done an impressive job and our entire community
will be thankful to you. http://forum.altaycoins.com/viewtopic.php?id=693747
What a information of un-ambiguity and preserveness of valuable know-how on the topic oof unexpected feelings. https://worldaid.eu.org/discussion/profile.php?id=102
I aam genuinely thankful too the holder of this web page who has shaared this enormous paragraph at at this place. https://camillacastro.us/forums/viewtopic.php?id=327938
Howdy! Someone in my Facebook group shared this
site with uus so I came to loo it over. I’m definitely
enjoying the information. I’m book-marking and will be tweeting thi to my
followers! Outstanding blog and wonderful design and style. https://camillacastro.us/forums/viewtopic.php?id=329302
What’s up, for all time i used to check website posts here in tthe
early hours in the break of day, because i enjoy to learn more and more. https://www.fionapremium.com/author/kristoferma/
An outstanding share! I have just forwarded this onto a co-worker who had
been conductimg a little homework on this. And he actually ordered me lunch because I found
iit for him… lol. So let me reword this…. Thanjk YOU foor the meal!!
But yeah, thanks foor spending some time to talk
about this matter here on your website. http://forum.altaycoins.com/viewtopic.php?id=693748
I am regular visitor, how are youu everybody? This piece of writing postwd at this
website is really fastidious. https://www.alonegocio.net.br/author/elinor92b50/
If some one desires to be updated with neweest technologies
then he must be pay a visit this web site and be up
to datre everyday. https://migration-bt4.co.uk/profile.php?id=306227
Excellent blog! Do you have anny recommendaions for aspiring writers?
I’m planning tto start my own website soon but I’m a little
lodt on everything. Would you suuggest starting with a fee
platform like WordPress or go for a paid option? There
are so many choices out there that I’m completelky overwhelmed ..
Any tips? Cheers! http://another-ro.com/forum/viewtopic.php?id=151986
I do not even understand how I ended up here, but I assumed this publish used to be
great. I do not understand who you might be however certainly you’re goijg to a famous blogger for those who aren’t already.
Cheers! https://camillacastro.us/forums/viewtopic.php?id=327296
Hey very niice blog! http://forum.altaycoins.com/viewtopic.php?id=695349
Excellent post. I ccertainly love this website. Keep it up! http://forum.altaycoins.com/viewtopic.php?id=693851
I will immediately grab your rss as I can not to find your e-mail subscription hyperlink or e-newsletter
service. Do you’ve any? Please allow me understand in order that I may subscribe.
Thanks. https://www.fionapremium.com/author/taneshahump/
Good post. I’m going through many of these issuees as well.. http://links.musicnotch.com/claudia81700
Link exchange is nothing else however it is just placing the other person’s web site link on your age at appropriate
place and other person will also do similar in support of you. https://depot.lk/user/profile/29843
I am really inspired together wiyh your writing skills and also with
the structure for your blog. Is that this a pwid subject or did you customize it
yourself? Either way stay upp the excellent quality writing, it’s uncommon to
see a great blog like this one these days.. https://98e.fun/space-uid-7730760.html
Howdy would you mind stating which blog platform you’re using?
I’m going to start my own blog in the near future but I’m havving
a tough time choosing between BlogEngine/Wordpress/B2evolution and
Drupal. The reason I aask is because your design seems different then most blogs aand I’m looking for
something unique. P.S Sorry for getting off-topic
but I haad to ask! http://forum.altaycoins.com/profile.php?id=474057
Wow! Finally I got a website from where I know how to in fact
obtain valuable facts regarding my study and knowledge. http://links.musicnotch.com/amosbown0614
Excellent article. I will be facing a few of these issues as well.. https://advansbum.by/?option=com_k2&view=itemlist&task=user&id=888289
It’s appropriate time to make some plans for the future
and it’s time to bee happy. I’ve reaqd this post and iff
I could I wish to suggest you some interesting things or
suggestions. Perhaps you could write next articles referring
to thos article. I desire to read more things about it! http://kartalescortyeri.com/author/bess10y0196/
Wow that was strange. I just wrote an really long comment but after I clicked submit my comment
didn’t show up. Grrrr… well I’m not writing all
that over again. Regardless, just wanted to say excellent blog! https://camillacastro.us/forums/viewtopic.php?id=327659
I was more thsn happy tto find this site. I wanted to thank you foor your time due too this fantastic read!!
I definitely enjoyed every bit oof it and i also have you bookmarked to see new
stuff on your web site. https://www.mazafakas.com/user/profile/4176884
You have made some really good points there. I looked on the web to learn more about the issue and founbd most
individuals will goo along wit your vieas on this web site. http://forum.altaycoins.com/viewtopic.php?id=696066
Admiring the time and energy yyou pput into your site and
in depth information you offer. It’s good to ome across a blog every once iin a while
that isn’t the same old rehashed material. Fantastic read!
I’ve saved your site and I’m adding your RSS
feeds to my Google account. https://www.fionapremium.com/author/vidaarce29/
I am sure this paragraph has touched all the internet people, its really
really nice article on building up new blog. https://98e.fun/space-uid-7730999.html
Hello, Neat post. There’s a probem along with your website in internet
explorer, would test this? IE still is the maroet leader
and a huge part of other people will miss your wonderful writkng due to
this problem. https://bicycledude.com/forum/profile.php?id=1524096
It’s impressive that you are gettting ideas from this piece of writing as well as from our argument
made here. https://camillacastro.us/forums/viewtopic.php?id=327431
Hello, after reading this amazing article i am also happy to
share mmy know-how here with mates. https://depot.lk/user/profile/29282
I was curious if you ever thought of changng the structure off your site?
Its very well written; I love what youve got to say.
But maybe you could a littoe more in the way of content sso people could connect with it
better. Youve got an awful lot off text for only haing oone or two images.
Maybe you could space it out better? https://www.fionapremium.com/author/amadoahmed/
Actually when someone doesn’t understand afterward its up to other users that they will help, so here it occurs. https://depot.lk/user/profile/29721
Howdy! I know this is somewhat off topic but I was wondering which blog platform are you using for
this site? I’m getting fedd up of WordPress because I’ve haad problems
with hackers and I’m looking at options for another platform.
I would be fantastic if you could point me iin the direction of a good platform. http://forum.altaycoins.com/viewtopic.php?id=696049
whoah this blog is great i love reading your articles.
Stay up the great work! You know, many people are hnting
rond for this information, you can aid them greatly. http://forum.altaycoins.com/viewtopic.php?id=695309
When I originally commenmted I clicked the “Notify me when new comments are added” checkbox and now each time a comment is added I get several emails with thee same comment.
Is there any way you can remove people from that
service? Thanks! http://www.ozsever.com.tr/component/k2/itemlist/user/406369
excellent points altogether,you simply gained a new reader.
What may you recommend in regards to youyr post that you simply made some daays in the past?
Any certain? https://depot.lk/user/profile/29277
You actually make it seemm so easy with your presentation but I find this
matter to be really something which I think I would
never understand. It seems too complex and very broad for me.
I am looking forward for your next post, I will try to get the hang of it! http://links.musicnotch.com/katrin17b016
Itts like you read my mind! You appear to know so much about this,
like you wrlte the book in it or something. I think that you can do
with a few pics to drive the message home a little bit, but instead
of that, this is excellent blog. A great read. I’ll certainly be back. https://www.erotikanzeigen4u.de/author/gildaembry/
Thanks , I have jhst beeen looking for information approximately this topic for ages and your is thhe greatest
I have found out till now. But, what concerning the conclusion?
Aree you sure concernin the source? https://camillacastro.us/forums/viewtopic.php?id=327052
Howdy, i read your blog occasionally andd i own a similar one and i was just wondering if you get
a lot of spam feedback? If so how do you protect against it,
any plugin or anything you can advise? I get so
much lately it’s driving me insane soo any assistance is very much appreciated. https://worldaid.eu.org/discussion/profile.php?id=66
Whats up this is kind of of off topic but I was wanting to know if blogs use WYSIWYGeditors orr if you have
to manually code with HTML. I’m starting a blog soon but hwve no coding knowledge soo I wanted to
get advice froom soeone with experience. Any help would
be greatly appreciated! https://worldaid.eu.org/discussion/profile.php?id=94
Heya i am for the first time here. I found this board and I
in finding It really useful & it helped me out a lot.
I’m hoping to present one thing again and aid others like youu aided me. https://www.alonegocio.net.br/author/alisianatio/
I enjoy, lead to I found just wat I was having a lok for.
You’ve ended myy four day length hunt! God Bless youu man. Have a
nice day. Bye http://forum.altaycoins.com/viewtopic.php?id=695192
Pretty nice post. I simply stumbld upon your bblog and wished to mention that I’ve truly loved browsing
your blog posts. In any case I’ll be subscribing in your feed and I’m hoping you write once more soon! https://www.alonegocio.net.br/author/heathtricke/
This is a great tip especially to those fresh
too the blogosphere. Brief but very accurate information… Maany thanks
for shariung this one. A must read article! https://oncallescorts.com/author/tonineidig1/
Today, I went to the beach with my children. I fund
a sea shell and gave it too my 4 year olld daughter and said “You can hear the ocean if you put this to your ear.” She placed the shell to her eaar aand screamed.
There was a hermit crab inside and it pinched her ear.
She never wants to go back! LoL I know this is totally off topic but I had too tell someone! https://advansbum.by/component/k2/itemlist/user/888328
Hello, this weekend iss pleasant for me, as this
occasion i amm reading this great educational post here at my house. https://98e.fun/space-uid-7730785.html
If you would like to get a ood deal from this post then you
have to apply these methods to our won webpage. https://www.alonegocio.net.br/author/marsharoush/
Magnificent wweb site. Lots of helpful info here.
I’m sending it to several pals anns additoonally sharing
in delicious. And certainly, thanks to your
sweat! https://migration-bt4.co.uk/profile.php?id=304507
Howdy! Do you know if they make any plugins to help with SEO?
I’m trying to get my blog to rank for some
targeted keywords but I’m not seeing very good success. If you know
off any please share. Kudos! http://forum.altaycoins.com/viewtopic.php?id=695177
This post iss invaluable. When can I find out more? https://advansbum.by/?option=com_k2&view=itemlist&task=user&id=888303
There’s certainly a great deal to now about tis topic.
I really lioe all the points you have made. http://forum.altaycoins.com/viewtopic.php?id=693501
Article writing is also a excitement, if youu be acquainted with then you can write otherwise it iss complex to write. http://links.musicnotch.com/juanita49903
Aw, this was a really nice post. Taking the time and actual effort to make
a top notch article… but what can I say… I put things off a lot and don’t manage to get anything done. http://forum.ainsinet.fr/profile.php?id=351833
Awesome issues here. I am verey satisfied tto look yoyr article.
Thank you so much and I’m looking ahead to ouch you. Willl you kindly drop me a
e-mail? https://beekinds.blogspot.com/2024/05/what-is-charitable-organization.html
Hi there, I log on to your blog on a regular basis. Your story-telling style is witty,
keep doing what you’re doing! https://beekinds.mystrikingly.com/
Thanks for finally writing about >How to Draw Fashion Illustration:
Fashion Figure 101 – Event Artist <Liked it! https://664dfc39db254.site123.me/
What a material of un-ambiguity and preserveness of valuable
experience regarding unpredcted feelings. https://comm-support.mystrikingly.com/
I don’t know if it’s just me or if everybody else encountering issues with yur site.
It looks loke some of the written text oon your posts are
running off the screen. Cann smebody else please provide feedback and let me know if this is happening to them as well?
This might be a issue with my browser because I’ve
had this happen previously. Cheers https://4supports.mystrikingly.com/
Amazing things here. I am very glasd to see your article.
Thanks so much aand I’m having a look forward to touch you.
Will yoou kindly drop me a mail? https://664e08ea27411.site123.me/
Valuable information. Fortunate me I discovered your web site by
chance, and I’m surprised why this tist of fate did not happened
earlier! I bookmarked it. https://gametrends5.wordpress.com/@his.dewuch.com:mail.dewuch.com:110:his.dewuch.com:MbwppskjUrrk
You are so interesting! I don’t think I have read anything lijke
that before. So good too find somebody with some unique thoughts on this subject matter.
Seriously.. thanks foor staeting this up. This site is onee thing that is required on the internet, someone with a bit of originality! https://gamingera2.wordpress.com/
I’ve read a few excelkent stuff here. Deefinitely
value bookmarking for revisiting. I surprise how much attempt you set to create any
such magnificent informative website. https://telegra.ph/Top-developments-driving-growth-for-video-games-05-22
Fine way of telling, and nice piesce of writing
to get data about mmy presentation subject, which i am going to
deliver in university. https://telegra.ph/Five-Most-Watched-Sporting-Events-In-the-World-05-22
Wow, amazing blog structure! How lengthy have you been blogging for?
you made blogging glance easy. The total look of
your site is excellent, let alone the content material! https://sporteventss.mystrikingly.com/
Attractive component to content. I jusdt stumbled upon your website aand
in accession capital to assert that I get actually loved account your blog posts.
Anyway I wiill be subscribing for your feeds and even I achievement
you access constantly quickly. https://sporttopevents.blogspot.com/2024/05/top-10-most-watched-sporting-events-in.html
An impreessive share! I have just forwarded thiks onto a co-worker wwho had
been conducting a little research on this. Annd he actually bought me breakfast
simply because I found it for him… lol. So allow me to reword this….
Thank YOU for the meal!! But yeah, thanks for spending ime to talk about this topic here onn your web site. https://newtop5technology.blogspot.com/2024/05/breakthroughs-that-change-our-lives.html
We are a gaggle of volunteers and starting a neww scheme inn our community.
Yoour website offered us with useful information to
work on. Youu have done a formidable task and our entire group mighjt be grateful to you. https://telegra.ph/Technology-trends-that-will-change-2024-05-23-2
What’s up all, here every person is sharing tese know-how, thus
it’s good to read this weblog, and I usesd to paay a visit this webpage every
day. https://topnewtechs.blogspot.com/2024/05/breakthroughs-that-change-our-lives.html
This iis my first time visit at here and i am truly impressed to read everthing at alone place. https://ourfutures.mystrikingly.com/
This design is steller! Youu definitely know how to keep a reader entertained.
Beetween your wit and your videos, I was almost moved to start my own blog (well, almost…HaHa!) Wondereful job.
I really enjoyd what you had to say, and more than that,how you presented
it. Tooo cool! https://telegra.ph/Guide-to-Wildlife-Travel-05-23
Thanks for a marvelous posting! I really enjoyed readikng
it, you could be a great author. I will ensure that I bookmark your blog and will often come back in the
future. I want to encourage yourself to continue your great writing,
have a nice evening! https://travelbugets.wordpress.com/
Oh my goodness! Incredible article dude! Thank you, Howerver
I am going though difficulties with your RSS. I don’t understand why I am unable tto join it.
Is there anyone else having identical RSS problems? Anyone who knows the answer can you kinhdly respond?
Thanx!! https://wildtravels9.wordpress.com/
I am regular reader, how are you everybody? This paragraph posted at this site is
in fact pleasant. https://telegra.ph/The-Ultimate-Guide-to-Wildlife-Travel-05-23
This site was… how do you say it? Relevant!!
Finally I have found something that helped me. Appreiate
it! https://makesomenew.mystrikingly.com/
Simply desire to say your article is as astounding.
The clarity for your publiwh is just excellent and i can think
you’re knowledgeable in this subject. Fine along with your permission let me to clutch your RSS feed to keep updated wth
fortncoming post. Thanks one millkion andd please carry on the rewardingg work. https://graphicdesign2024.wordpress.com/
Asking questions are actually good thing if you are not understanding anything fully, except this
paragraph provides fastidious understanding yet. https://graphicdesigntrend3.wordpress.com/
This is a topic which is near to my heart… Take care!
Where are your contact details though? https://graph-designss.blogspot.com/2024/05/10-inspiring-graphic-design-trends-for.html
certainly like your web-site however you need to take a
look at the spelling on several of your posts. Several of them are rife with spelling
issues annd I to find it very troublesome to telll tthe trruth howeve I’ll surely
come again again. https://www.pearltrees.com/alexx22x/item598959772
Hey I know thus is ooff toic but I was wondering if you knew of any widgets I could aadd to my
blog that automatically tweet my neweest twitter updates.
I’ve been looking for a plug-in like this for quite
some time and was hoping maybe you would have some experience with
something like this. Please let me know if you run into anything.
I truly enjoy reading your blog and I look forward to
your new updates. https://www.pearltrees.com/alexx22x/item598940136
I know tuis iif off topiic buut I’m looking into starting my own weblog and was curilus what all
is required to get set up? I’m assuming havng a blog like yours
would cst a pretty penny? I’m not very web savvy so I’m not 100% sure.
Any recommendations or advice would bbe greatly appreciated.
Thanks https://scrapbox.io/toptech/Top_10_Latest_Technological_Innovations
Thanks for the auspicious writeup. It actually was a enjoyment account
it. Lookk complicated to far delivered agreeable from you!
However, how can we be in contact? https://caramellaapp.com/milanmu1/ReRl9wA2u/events
Hi there! This post couldn’t be written any better! Reading through thnis article reminds me off my previous roommate!
He constantly kept preaching about this. I am going too send this post to
him. Pretty sure he’ll have a good read. Thanks for sharing! https://scrapbox.io/gamings/The_10_Unmissable_Sporting_Events_that_Captivate_the_World
I just like the helpful information you supply on your articles.
I will bookmark your blog and test again right here frequently.
I am rsther sure I’ll be told a lot of new stuff right here!
Good luck for the next! https://scrapbox.io/newproprojects/Everything_you_need_to_know_about_creative_project_management
It’s fantastic thst you are getting thoughts from this paragraph as well
as from our argument made at thi time. https://posteezy.com/what-are-smart-contracts-blockchain-and-how-do-they-work-0
Избранные свежие новости часового искусства – последние новинки культовых часовых домов.
Абсолютно все варианты часов от доступных до супер гедонистических.
https://watchco.ru/
Страсть к сайту — чрезвычайно пользователю приятно и много, чтобы увидеть!
взгляните также мою страничку и дайте ей оценку
=0090=0=
It’s a pity you don’t have a donate button! I’d definitely donate to tbis superb
blog! I guess forr now i’ll settle for bookmarking and adding your RSS feed to my Google
account. I look forward to new updates and will share this site with my Facebook group.
Chat soon! https://camillacastro.us/forums/viewtopic.php?id=341362
An impressive share! I have just forwarded this onto a colleague who has been conducting
a littgle homework on this. And hee actually bought mee lunch due to
the fact that I found it for him… lol. So allow me too reword this….
Thanks for the meal!! But yeah, thanx for spending the
time to talk about this topic here on your web page. https://camillacastro.us/forums/viewtopic.php?id=341342
It’s awesome to pay a visit this website and reading the views of all friends concerning this post, while I am also eager off
getting knowledge. https://indicaflower.exposed/2024/05/21/%d1%80%d0%b5%d1%94%d1%81%d1%82%d1%80%d0%b0%d1%86%d1%96%d1%8f-%d0%b2-%d0%b1%d0%b5%d1%82-%d0%bc%d0%b0%d1%82%d1%87/
Please let mee know iif you’re lookinmg for a article author for
your site. You have some really god posts and I believe I would be
a ggood asset. If you ever want to take some of the load off, I’d absolutely love to write
some content for your blog in exchange for a link back to mine.
Please send me an e-mail iif interested. Many thanks! https://camillacastro.us/forums/profile.php?id=172294
Hi, i think thzt i saw you visited my siite so i came tto “return the favor”.I am attempting too find
things to enhance my web site!I suppose its ok
to use a feww of youjr ideas!! https://icoon.co.uk/%d0%be%d0%b3%d0%bb%d1%8f%d0%b4-%d0%ba%d0%b0%d0%b7%d0%b8%d0%bd%d0%be-%d0%b1%d0%b5%d1%82%d0%bc%d0%b0%d1%82%d1%87-%d1%83%d0%ba%d1%80%d0%b0%d1%97%d0%bd%d0%b0/
Heya! I’m at work surfing around your blog from my new apple iphone!
Just wanted to say I love reading your blog and look forward
to all your posts! Carry on the superb work! https://digitaldamas.com/blog/index.php?entryid=36252
My brother suggested I might lke this blog. He was entirely right.
This post actually made my day. You can not imagine just
how much time I had spent for this info! Thanks! https://camillacastro.us/forums/profile.php?id=172280
Абсолютно все свежие новости часового мира – актуальные коллекции легендарных часовых марок.
Все модели хронографов от доступных до супер дорогих.
https://bitwatch.ru/
Nice blog right here! Also your site a lot up fast! What web host are you the
use of? Can I get your associate hyperlink to your host?
I desire my website loaded up as fsst as yours lol https://promed-sd.com/blog/index.php?entryid=71044
Excellent beat ! I wish to apprenticce at the same time as you amend your website, how
could i subscribe for a weblog site? The account aided mee a
appropriate deal. I had been tiny bit acquainted of this your
broadcast provided vibrant transparent concept https://heylookielookie.com/2024/05/21/%d0%ba%d0%b0%d0%ba-%d0%b7%d0%b0%d1%80%d0%b5%d0%b3%d0%b8%d1%81%d1%82%d1%80%d0%b8%d1%80%d0%be%d0%b2%d0%b0%d1%82%d1%8c%d1%81%d1%8f-%d0%bd%d0%b0-bet-match/
I blog often and I truly appreciate your information. Your article has really peaked my interest.
I am going too take a note of your website and keepp checking for new information about once
a week. I opted in for your Feed too. https://forum.fne82.org/profile.php?id=499801
Thank you for the auspicious writeup. It if truth be told was a amusement
account it. Look complicated to moree introduced agreeable from you!
By the way, how can we be in contact? https://tangnest.rw/blog/index.php?entryid=23757
Exceptional post however , I was wondering if you could write a litte more on this subject?
I’d be vvery thankful if yyou could elaborate a little bit more.
Bless you! https://www.pitstopodium.com/f1-news/bet-match-%d0%b1%d0%be%d0%bd%d1%83%d1%81%d0%b8-%d0%b2%d1%96%d0%b4-%d0%be%d0%bd%d0%bb%d0%b0%d0%b9%d0%bd-%d0%ba%d0%b0%d0%b7%d0%b8%d0%bd%d0%be/
Hey! I know this is kond of off topic but I was wondering which blog platform are you using for this website?
I’m getting fed up of Wordcpress because I’ve had problems with hackers and I’m
looking at options for another platform. I would be fantastic iff you could point me in the direction of a good platform. https://diaramjohnson.com/blog/2024/05/21/bet-match-%D0%B1%D0%BE%D0%BD%D1%83%D1%81%D0%B8-%D0%B2%D1%96%D0%B4-%D0%BE%D0%BD%D0%BB%D0%B0%D0%B9%D0%BD-%D0%BA%D0%B0%D0%B7%D0%B8%D0%BD%D0%BE/
Wow, superb blog format! How lengthy have you been running a blog for?
you make blogging look easy. The full look of your site is great,
as neatly ass the content! https://icoon.co.uk/bet-match-%d0%b1%d0%be%d0%bd%d1%83%d1%81%d0%b8-%d0%b2%d1%96%d0%b4-%d0%be%d0%bd%d0%bb%d0%b0%d0%b9%d0%bd-%d0%ba%d0%b0%d0%b7%d0%b8%d0%bd%d0%be/
Hey just wanted to give you a quick heads up. The words in your post seem to
be running off thee screen in Ie. I’m not sure if this is a format issue or
something to do with browser compatibility bbut I figured I’d post to let you know.
The layout look greast though! Hope you get the problem resolved soon. Cheers https://dreambuilderlab.com/%D0%BE-%D0%B1%D0%B5%D1%82%D0%BC%D0%B0%D1%82%D1%87/
I am really impresssed with your writing skills and also
with the layout on your weblog. Is this a aid themne or did you
modify it yourself? Either way keep up the nice quality writing,
it’s rare tto see a grerat blog loke thjis one today. https://gamereleasetoday.com/%d0%be-%d0%b1%d0%b5%d1%82%d0%bc%d0%b0%d1%82%d1%87/
Do yyou have a spam problem on this site; I also am a blogger, and I was
wanting to know your situation; many of us have created some nice practices
and we are looking to swap methods with other folks, why not shoot me an e-mail if interested. https://careked.com/community/profile/kazukoescamilla/
Keep on working, great job! https://aisschool.ru/blog/index.php?entryid=33820
Thanks very nice blog! https://depot.lk/user/profile/34199
Hello!
Do you want to experience the thrill and excitement of cricket betting with the chance to win big? Then we have an excellent offer just for you!
We offer the best odds on cricket betting in the United Arab Emirates. Whether you’re an experienced bettor or a newcomer to the world of betting, with us, you can enjoy unforgettable experiences and possibly change your life for the better.
Why Choose Us?
– High Odds: We offer the most favorable odds that increase your chances of winning big.
– Wide Selection of Matches: Enjoy betting on the most thrilling cricket matches and tournaments.
– Safety and Reliability: Your safety and confidentiality are our priority. You can trust the fairness and transparency of all operations.
– Ease and Convenience: Betting with us is easy and convenient, even if you’ve never done it before. Our platform is intuitive and accessible from any device.
– Exclusive Bonuses: Receive special offers and bonuses for new and existing customers.
Try Now!
Don’t miss the opportunity to experience the real thrill and adrenaline rush of cricket betting! Even if you’ve never bet before, now is the time to try. It’s simple, safe, and could become your new exciting hobby.
Special Offer for New Customers:
Register now and receive a bonus on your first deposit! Increase your chances of winning from the very beginning.
Contact us to learn more and place your first bet. This is your chance to experience new sensations and maybe hit the jackpot!
Best regards, https://1xbeticricetc1xbetti5.ru/
Hello!
Do you have a website and want more people to visit it? Do you want it to rank high in search engines and bring in more customers? We have the perfect solution for you!
We offer unique databases and keys for use with Xrumer and GSA software, which will help you:
– Attract More Visitors: Increase traffic to your site using powerful link-building tools.
– Boost Your Search Engine Rankings: Improve your site’s positions on Google and other search engines.
– Save Time and Money: Instead of spending resources on complex and expensive marketing campaigns, you can use ready-made solutions that work.
What We Offer:
– Xrumer databases: Specially selected and verified databases that will help you create quality backlinks and increase your site’s visibility.
– GSA Databases and Keys: Easily integrable databases and keys that allow you to automate the link-building process and enhance your SEO.
Why Choose Us?
– Proven Quality: Our databases and keys undergo strict verification to ensure maximum effectiveness.
– Ease of Use: You don’t need to be an expert in SEO or link building. Our solutions are intuitive and easy to use.
– Support and Consultation: We are always ready to help and answer any questions so you can make the most of our products.
Don’t miss the chance to take your website to the next level! Order Xrumer and GSA databases today and start attracting more customers.
Best regards, Drop Dead Studio!
Contact us now to learn more and take the first step towards success!
To contact us, write to telegram https://t.me/DropDeadStudio
Our team is as passionate about cricket as you are, and we’re here to make your betting experience unforgettable https://cricetc1xbetr1xbetcc2.ru/.
Our team is as passionate about cricket as you are, and we’re here to make your betting experience unforgettable https://1xbetecricete1xbetei4.ru/.
At CricketBet, we bring the excitement of cricket betting to the vibrant landscape of the United Arab Emirates. Join us for a rollercoaster ride of predictions and wins https://1xbeticricetc1xbetti5.ru/!
Experience the thrill of betting on cricket matches in the heart of the United Arab Emirates. Get ready to win big and cheer for your favorite teams https://1xbett1xbetc1xbetir4.ru/!
Наша страсть к дизайну и индивидуальному подходу позволяет нам создавать кухни, которые отражают ваш стиль и вкус https://kupitkuhnyu-ot-proizvoditelya.ru/.
Наши базы – это не просто данные, это ключ к доминированию в поисковых системах. Доверьте свой рост нам https://bazydlyaxrumerkupitt.ru/!
Каждая кухня уникальна и создана специально для вас, отражая вашу индивидуальность и стиль https://kupitkuhnyu-ot-proizvoditelya.ru/.
Experience the thrill of betting on cricket matches in the heart of the United Arab Emirates. Get ready to win big and cheer for your favorite teams https://1xbetecricete1xbetei4.ru/!
Мы работаем над увеличением скорости и совместимости с новыми платформами для вашего удобства https://bazydlyaxrumerkupitt.ru/.
Участвуйте в увлекательных мастер-классах и соревнованиях, чтобы стать настоящим шеф-поваром https://kupitkuhnyucena6.ru/!
Мы – команда профессионалов, готовых ускорить ваш путь к онлайн-успеху с помощью уникальных баз для XRumer и GSA Search Engine Ranker https://bazydlyaxrumerkupitt.ru/.
Доверьте нам создание кухни вашей мечты и погрузитесь в мир вкуса и уюта https://kupitkuhnyucena6.ru/!
Лучший выбор для тех, кто ценит качество и стиль. Рекомендую всем https://kupitkuhnyumagazin.ru/!
Our team is as passionate about cricket as you are, and we’re here to make your betting experience unforgettable https://1xbeticricetc1xbetti5.ru/.
Мы – команда страстных кулинаров, которые превращают ваши мечты о кухне в реальность https://kupitkuhnyucena6.ru/.
Мы – команда профессионалов, которая превращает ваши мечты в реальность. Каждая кухня у нас – это произведение искусства и функциональности https://kupitkuhnyunedorogo.ru/.
At CricketBet, we bring the excitement of cricket betting to the vibrant landscape of the United Arab Emirates. Join us for a rollercoaster ride of predictions and wins https://1xbett1xbetc1xbetir4.ru/!
Мы не просто продаём кухни, мы создаём шедевры, которые будут восхищать вас каждый день https://kupitkuhnyunedorogo.ru/.
Experience the thrill of betting on cricket matches in the heart of the United Arab Emirates. Get ready to win big and cheer for your favorite teams https://cricetc1xbeticricetec2.ru/!
Уникальные кухни на заказ в Москве, которые превратят вашу кухню в настоящий шедевр. Доверьте свои кулинарные фантазии нам https://kupitkuhnyu-ot-proizvoditelya.ru/!
Покорите вершины рейтингов вместе с нами https://bazydlyaxrumerkupitt.ru/!
Level up your game with insider tips and tricks for serious punters https://cricetc1xbetr1xbetcc2.ru/.
Погрузитесь в мир волшебства и вкуса вместе с нашими талантливыми поварами и артистами https://kupitkuhnyucena6.ru/!
Кухни от КухниМаркет – это просто сказка! Каждый день – праздник https://kupitkuhnyumagazin.ru/!
Наша миссия – сделать кухню не просто местом приготовления пищи, а настоящим источником радости и вдохновения https://kupitkuhnyumagazin.ru/.
Кухни просто супер! Не могу нарадоваться своей новой кухне, спасибо фабрике https://kupitkuhnyunedorogo.ru/!
Welcome to the ultimate destination for cricket enthusiasts who want to spice up the game with some adrenaline-pumping bets https://1xbeticricetc1xbetti5.ru/!
Наша команда опытных специалистов обеспечит качественный и профессиональный монтаж вашей кухни https://kupitkuhnyu-ot-proizvoditelya.ru/.
Присоединяйтесь к нам и узнайте секреты итальянской кухни от наших шеф-поваров https://kupitkuhnyucena6.ru/!
Невероятное качество баз! Рекомендую всем, кто хочет быть на пике https://bazydlyaxrumerkupitt.ru/!
At CricketBet, we bring the excitement of cricket betting to the vibrant landscape of the United Arab Emirates. Join us for a rollercoaster ride of predictions and wins https://cricetc1xbeticricetec2.ru/!
Мы – команда мастеров, создающих кухни мечты для каждого клиента. Вдохновляйтесь идеями и воплощайте их в жизнь с нами https://kupitkuhnyumagazin.ru/!
Индивидуальные дизайны кухонь, которые вдохнут жизнь в ваш дом https://kupitkuhnyu-ot-proizvoditelya.ru/.
Welcome to the ultimate destination for cricket enthusiasts who want to spice up the game with some adrenaline-pumping bets https://cricetc1xbetr1xbetcc2.ru/!
Лучшее решение для кухни! Качество на высоте, заказал здесь и не пожалел https://kupitkuhnyunedorogo.ru/.
Hello!
Do you want to experience the thrill and excitement of cricket betting with the chance to win big? Then we have an excellent offer just for you!
We offer the best odds on cricket betting in the United Arab Emirates. Whether you’re an experienced bettor or a newcomer to the world of betting, with us, you can enjoy unforgettable experiences and possibly change your life for the better.
Why Choose Us?
– High Odds: We offer the most favorable odds that increase your chances of winning big.
– Wide Selection of Matches: Enjoy betting on the most thrilling cricket matches and tournaments.
– Safety and Reliability: Your safety and confidentiality are our priority. You can trust the fairness and transparency of all operations.
– Ease and Convenience: Betting with us is easy and convenient, even if you’ve never done it before. Our platform is intuitive and accessible from any device.
– Exclusive Bonuses: Receive special offers and bonuses for new and existing customers.
Try Now!
Don’t miss the opportunity to experience the real thrill and adrenaline rush of cricket betting! Even if you’ve never bet before, now is the time to try. It’s simple, safe, and could become your new exciting hobby.
Special Offer for New Customers:
Register now and receive a bonus on your first deposit! Increase your chances of winning from the very beginning.
Contact us to learn more and place your first bet. This is your chance to experience new sensations and maybe hit the jackpot!
Best regards, https://1xbeticricetc1xbetti5.ru/
At CricketBet, we bring the excitement of cricket betting to the vibrant landscape of the United Arab Emirates. Join us for a rollercoaster ride of predictions and wins https://1xbetecricete1xbetei4.ru/!
Мечтаете о кухне вашей мечты? Мы воплотим ваши желания https://kupitkuhnyumagazin.ru/!
Our team is as passionate about cricket as you are, and we’re here to make your betting experience unforgettable https://cricetc1xbeticricetec2.ru/.
Welcome to the ultimate destination for cricket enthusiasts who want to spice up the game with some adrenaline-pumping bets https://1xbetecricete1xbetei4.ru/!
Very nice article, just whaat I wanted to find. https://www.hackerrank.com/challenges/simple-game/forum/comments/1157274
Great post. https://www.alibabacloud.com/forum/read-9242
Hello my loved one! I want to sayy that this artgicle is awesome,
great written aand come with almost all vital infos. I’d like to look extra posts like this . https://www.horseracingnation.com/user/AviAtorGAmeApp
Hello There. I found your blog using msn. This is a really well
written article. I will be sure to booknark itt and return to read more of your
useful info. Thanks for the post. I will certainly return. https://sites.google.com/view/evolution-of-the-game/%D0%B3%D0%BE%D0%BB%D0%BE%D0%B2%D0%BD%D0%B0-%D1%81%D1%82%D0%BE%D1%80%D1%96%D0%BD%D0%BA%D0%B0?authuser=6
Мы используем только лучшие материалы и технологии для создания кухонь, которые прослужат вам долгие годы https://kupitkuhnyu-ot-proizvoditelya.ru/.
Experience the thrill of betting on cricket matches in the heart of the United Arab Emirates. Get ready to win big and cheer for your favorite teams https://1xbeticricetc1xbetti5.ru/!
Our team is as passionate about cricket as you are, and we’re here to make your betting experience unforgettable https://1xbett1xbetc1xbetir4.ru/.
At CricketBet, we bring the excitement of cricket betting to the vibrant landscape of the United Arab Emirates. Join us for a rollercoaster ride of predictions and wins https://cricetc1xbetr1xbetcc2.ru/!
Level up your game with insider tips and tricks for serious punters https://1xbetecricete1xbetei4.ru/.
Welcome to the ultimate destination for cricket enthusiasts who want to spice up the game with some adrenaline-pumping bets https://1xbett1xbetc1xbetir4.ru/!
Welcome to the ultimate destination for cricket enthusiasts who want to spice up the game with some adrenaline-pumping bets https://cricetc1xbeticricetec2.ru/!
Thanks a lot fοr providing individuals wіth an extaordinarily spectacular possiblity tо reaqd critical reviews fгom this website.
It іs lways very enjoyable аnd as wеll , jam-packed
with a gοod tіme for mme annd my office friends tⲟ visit tһe blog at a minimᥙm 3
timеs in 7 days to learn tһe neԝest tips yoou wіll һave.
And of coսrse, we’reactually satisfied fⲟr thhe dszzling techniques served byy уou.
Ceгtain tѡo factѕ in this article ɑrе absoⅼutely the most suitable
ѡe havge ever haԁ.
Уникальные кухонные шедевры ждут вас https://vycypeo6kuhnyanazakaz.ru/!
Присоединяйтесь к нам и откройте новый уровень кулинарного опыта https://guzywia4kuhnyanazakaz.ru/!
У нас вы найдете самые необычные идеи для вашей кухни, которые заставят вас влюбиться в готовку снова https://kitubeu2kuhnyanazakaz.ru/!
Погрузитесь в мир кулинарных искусств, где каждая кухня – это отражение стиля и вкуса https://kitubeu2kuhnyanazakaz.ru/.
Мы – команда талантливых дизайнеров, воплощаем в жизнь ваши самые дерзкие кулинарные фантазии https://xehyroo5kuhnyanazakaz.ru/.
Превратите свою кухню в шедевр https://xehyroo5kuhnyanazakaz.ru/!
Доверьте нам создание кухни, которая станет сердцем вашего пространства https://tovudyi4kuhnyanazakaz.ru/.
Откройте мир волшебства в каждой кухне от фабрики КухниФаб. Погрузитесь в удивительный мир вкусов и креативного дизайна https://guzywia4kuhnyanazakaz.ru/!
Мы – команда талантливых дизайнеров и мастеров, готовых воплотить в жизнь любую кухню вашей мечты https://vycypeo6kuhnyanazakaz.ru/.
У нас нет предела совершенству! Мы создаем гарнитуры, которые будут радовать вас каждый день https://vycypeo6kuhnyanazakaz.ru/.
Мы – команда страстных энтузиастов, создающих кухни, которые превращают готовку в волшебство https://guzywia4kuhnyanazakaz.ru/.
Наши кухни – это не просто мебель, это искусство, которое оживляет ваш дом https://tovudyi4kuhnyanazakaz.ru/.
Точно трендовые события мировых подиумов.
Исчерпывающие эвенты лучших подуимов.
Модные дома, бренды, высокая мода.
Приятное место для модных людей.
https://fashionablelook.ru
Experience the thrill of betting on cricket matches in the heart of the United Arab Emirates. Get ready to win big and cheer for your favorite teams https://cricetc1xbetr1xbetcc2.ru/!
Доверьте нам свои желания, и мы превратим их в кулинарное произведение искусства https://vycypeo6kuhnyanazakaz.ru/!
Откройте для себя новые гастрономические горизонты и дизайнерские возможности https://kitubeu2kuhnyanazakaz.ru/.
Level up your game with insider tips and tricks for serious punters https://1xbett1xbetc1xbetir4.ru/.
Excellent post. I was checking constantly this wsblog and I am impressed!
Extremely useful ino specificaally the final section :
) I maintain such information much. I used tto be seeking this particular
information for a long time. Thanks aand good luck. https://www.pitstopodium.com/f1-news/mastering-the-way-of-essay-writing-shouldnt-be-an-accident-it-is-an-art/
Actually whhen someone doesn’t knnow after that its up to other visitors that they
will assist, so here it happens. https://keralaclick.com/classified-advertising/for-sale/art-collectibles/they-asked-a-hundred-experts-about-essay-writing-one-reply-stood-out_i167260
Hi there, I found your website by way of Google whilst looking
for a similar matter, your website camne up, it looks good.
I’ve bookmarked itt in my google bookmarks.
Hi there, simply changed into aware of your weblog via Google, and located
that it’s really informative. I am gonna watch outt for brussels.
I’ll appreciate in the event you proceed this in future.
Numerous people can be bnefited oout of your writing. Cheers! https://njspmaca.in/2024/06/20/genghis-khans-guide-to-essay-writing-excellence/
Thank you a bunch for sharing this with all folks yoou actually understand what you’re speaking approximately!
Bookmarked. Please additionally seek advice from my website =).
We may have a link alternate agreewment betwen us http://forum.altaycoins.com/profile.php?id=559062
I have read so many content about the blogger lovers however this article is in fact a nnice paragraph, keep it up. https://classificados.pantalassicoembalagens.com.br/index.php?page=user&action=pub_profile&id=706846
I like the hlpful info you privide in your articles. I will bookmark your bkog
and chedck again heree frequently. I am quite sure I’ll learn plenty of new stuff right here!
Good luck foor the next! https://www.buy1on1.com/user/profile/2679608
I am actually grateful to the owner of this website who has shzred this impressive piece
of writing at at this place. https://ladder2leader.com/four-questions-and-answers-to-essay-writing/
Whats up this is somewhat of off topic but I was wanting to
know if blogs use WYSIWYG editors or if you have to manually code with HTML.
I’m starting a blog soon but have no coding knowledge so I wanted to get guidance frim someone wih experience.
Anyy help wold be enormously appreciated! https://anto2.com/index.php?page=user&action=pub_profile&id=4894
Excellent post! We are linking to this particularly great content
on our site. Keep up the great writing. https://findbestserver.com/the-ultimate-secret-of-essay-writing/
Мы – команда страстных кулинаров и дизайнеров, создающая кухни мечты для вас https://tovudyi4kuhnyanazakaz.ru/!
Кухни про кухню! Погрузитесь в мир кулинарных шедевров с нашими уникальными кухнями прямо от производителя https://tovudyi4kuhnyanazakaz.ru/!
Точно важные события моды.
Важные события известнейших подуимов.
Модные дома, торговые марки, haute couture.
Свежее место для стильныех хайпбистов.
https://modavgorode.ru
This article had me laughing and learning! For additional insights, check out: EXPLORE NOW. Any thoughts?
Добро пожаловать в Кулинариум – место, где встречаются вкус и дизайн! Мы исследуем разнообразие кухонь и вдохновляемся уникальными интерьерами https://kitubeu2kuhnyanazakaz.ru/.
Присоединяйтесь к нам и создайте кухню вашей мечты https://xehyroo5kuhnyanazakaz.ru/!
medication from mexico pharmacy: cmq mexican pharmacy online – п»їbest mexican online pharmacies
Наши кухни – это не просто мебель, это произведения искусства, которые вдохновляют на кулинарные подвиги https://xehyroo5kuhnyanazakaz.ru/!
medication from mexico pharmacy
https://cmqpharma.com/# mexican drugstore online
mexico drug stores pharmacies
Абсолютно важные события подиума.
Абсолютно все эвенты лучших подуимов.
Модные дома, лейблы, haute couture.
Самое приятное место для модных людей.
https://modaizkomoda.ru
Want to improve your SEO rankings and save time? Our premium databases for XRumer and GSA Search Engine Ranker are just what you need!
What do our databases include?
• Active links: Get access to constantly updated lists of active links from profiles, posts, forums, guestbooks, blogs, and more. No more wasting time on dead links!
• Verified and identified links: Our premium databases for GSA Search Engine Ranker include verified and identified links, categorized by search engines. This means you get the highest quality links that will help you rank higher.
• Monthly updates: All of our databases are updated monthly to ensure you have the most fresh and effective links.
Choose the right option for you:
• XRumer premium database:
o Premium database with free updates: $119
o Premium database without updates: $38
• Fresh XRumer Database:
o Fresh database with free updates: $94
o Fresh database without updates: $25
• GSA Search Engine Ranker Verified Links:
o GSA Search Engine Ranker activation key: $65 (includes database)
o Fresh database with free updates: $119
o Fresh database without updates: $38
Don’t waste time on outdated or inactive links. Invest in our premium databases and start seeing results today!
Order now!
P.S. By purchasing GSA Search Engine Ranker from us, you get a high-quality product at a competitive price. Save your resources and start improving your SEO rankings today!
To contact us, write to telegram https://t.me/DropDeadStudio
Полностью важные новости мировых подиумов.
Актуальные мероприятия известнейших подуимов.
Модные дома, бренды, гедонизм.
Лучшее место для стильныех хайпбистов.
https://myfashionacademy.ru/
Наиболее важные новинки мира fashion.
Абсолютно все мероприятия лучших подуимов.
Модные дома, бренды, гедонизм.
Интересное место для модных людей.
https://metamoda.ru/moda/599-doja-cat-vyzvala-bezumie-v-tope-i-yubke-iz-pishchevoy-plenki-s-rezhisserom-vetements-guram-gvasalia/
Level up your game with insider tips and tricks for serious punters https://1xbeticricetc1xbetti5.ru/.
Полностью свежие новости мировых подиумов.
Актуальные события известнейших подуимов.
Модные дома, лейблы, высокая мода.
Лучшее место для трендовых людей.
https://fashionvipclub.ru/news/2024-06-19-gruzin-kotoryy-perevernul-mirovuyu-modu-demna-gvasaliya/
Наши кухни не просто мебель, это произведения искусства, наполненные вдохновением и инновациями https://guzywia4kuhnyanazakaz.ru/.
Точно важные события модного мира.
Все эвенты мировых подуимов.
Модные дома, бренды, гедонизм.
Самое приятное место для стильныех людей.
https://hypebeasts.ru/
Самые трендовые события моды.
Исчерпывающие эвенты лучших подуимов.
Модные дома, бренды, гедонизм.
Новое место для стильныех людей.
https://luxe-moda.ru/chic/162-loro-piana-lyubimyy-brend-politikov-i-biznesmenov/
Level up your game with insider tips and tricks for serious punters https://cricetc1xbeticricetec2.ru/.
Точно важные новости мира fashion.
Все эвенты самых влиятельных подуимов.
Модные дома, лейблы, гедонизм.
Самое лучшее место для стильныех людей.
https://balmain1.ru/balmain/381-kak-otlichit-originalnyy-balmain-ot-poddelki/
I’m amazed, I must say Seldom do I come across a blog that’s equallyeducative and interesting, and let me tell you, you’vehit the nail on the head The issue is something too few folks are speaking intelligently aboutNow i’m very happy that I stumbled acrossthis during my search for something relating to this
یکی از خدمات نادر موسسه ما امکان اخذ پذیرش و سپس چاپ تضمینی مقاله شما در مجلات با ایندکس ISI JCR است. اهالی علم به خوبی میدانند که چنین خدمتی چه سختیها و چالشهایی دارد. برای کسب اطلاعات بیشتر و جزئیات انجام کار با ما در تماس باشید .
Thanks, this is a really great article. Regards, IDProperti.com | Pasang Iklan Properti
Полностью важные новости моды.
Абсолютно все новости самых влиятельных подуимов.
Модные дома, лейблы, гедонизм.
Самое лучшее место для модных хайпбистов.
https://km-moda.ru/style/525-parajumpers-istoriya-stil-i-assortiment/
Наиболее трендовые новинки индустрии.
Актуальные новости всемирных подуимов.
Модные дома, торговые марки, гедонизм.
Новое место для стильныех людей.
https://luxe-moda.ru/chic/356-rick-owens-buntar-v-chernyh-tonah/
best online pharmacies in mexico: mexican pharmacy online – buying from online mexican pharmacy
purple pharmacy mexico price list
https://cmqpharma.online/# mexico drug stores pharmacies
mexican mail order pharmacies
Hello!
Do you want to become the best SEO specialist and link builder or do you want to outpace your competitors?
Premium base for XRumer
$119/one-time
Get access to our premium database, which is updated monthly! The database contains only those resources from which you will receive active links – from profiles and postings, as well as a huge collection of contact forms. Free database updates. There is also the possibility of a one-time purchase, without updating the databases, for $38.
Fresh base for XRumer
$94/one-time
Get access to our fresh database, updated monthly! The database includes active links from forums, guest books, blogs, etc., as well as profiles and activations. Free database updates. There is also the possibility of a one-time purchase, without updating the databases, for $25.
GSA Search Engine Ranker fresh verified link list
$119/one-time
Get access to our fresh database, updated monthly! The fresh database includes verified and identified links, divided by engine. Free database updates. There is also the possibility of a one-time purchase, without updating the databases, for $38.
GSA Search Engine Ranker activation key
$65
With GSA Search Engine Ranker, you’ll never have to worry about backlinks again. The software creates backlinks for you 24 hours a day, 7 days a week. By purchasing GSA Search Engine Ranker from us, you get a quality product at a competitive price, saving your resources.
To contact us, write to telegram https://t.me/DropDeadStudio
Superb posts! Have a look at my page Webemail24 where I also put in extra effort to create quality information about Website Traffic.
What fabulous ideas you have concerning this subject! By the way, check out my website at Seoranko for content about Infertility Treatments.
Bookmarked, so I can continuously check on new posts! If you need some details about Social Media Marketing, you might want to take a look at Article Sphere Keep on posting!
Jasper also features more than 50 layouts that you
can make use of to create web content.
Самые стильные события мира fashion.
Актуальные события известнейших подуимов.
Модные дома, бренды, гедонизм.
Интересное место для модных людей.
https://modastars.ru/
great post, very informative I wonder why the other experts of this sector don’t notice this You should continue your writing I’m sure, you have a huge readers’ base already!
This strategy set you back $109 each month and comes with
3 team sheets.
Hello, we present to your attention a unique betting analyst bot.
The bot really works brings a stable profit, since it works according to an algorithm that is embedded in most BC, which reduces the probability of cutting the balance to zero.
The site itself also warns the protected server against detection, everything is included in the payment.
You can make a lot of bundles per day from the accounts of various BC and casino accounts, thereby increasing your daily income, and also, the site provides proven proxies to protect against a ban.
Check it out for yourself and make sure you won’t regret it.
https://goo.su/wxRN7G
I’ve besn exploriing for a little bit for anyy high-quality articles
or blog posts on this kond of house . Exploring in Yahoo I ultimatelyy stumbled upon this website.
Studying this information So i’m satisfied to convey
that I’ve a very just right uncanny feeling I found out exactly what I needed.
I soo mufh undoubtedly will make certin to don?t fail too remember this sife and give
it a look on a constant basis. https://www.provenexpert.com/en-us/1xbet-aviator-game/
Spot on with this write-up, I absolutely believe that this web site needs far more attention.
I’ll probably be back again to see more, thanks
foor the info! https://www.horseracingnation.com/user/Aviatorapp
Everything iss very open with a really clear explanation of the issues.
It was definitely informative. Your website is very useful.
Manny thanks for sharing! https://pixabay.com/users/aviator7777s-42577842/
My spouse and I absolutelky love your blog and find almost all of your post’s to bee precisely what I’m looking for.
can you offer guest writers to write content to suit your
needs? I wouldn’t mind publishing a post or elaborating on some of the subjects you write
related to here. Again, awesome blog! https://www.halaltrip.com/user/profile/158730/aviator-game12/
I’m amazed, I must say. Seldom do I come across a blog that’s both equally educative and
amusing, and let me tell you, you’ve hit the nnail on the head.
The problem is something which not enough folks are speaking intelligently about.
Now i’m very happy that I stumbled across this in my
hunt for something relating to this. https://www.themoviedb.org/u/Aviator1
Hello, off course tthis post is genuinely good and I have learned lot of things from it about
blogging.thanks. https://band.us/band/93711894/post/1
Asking questions are really pleasant thihg if you are not understanding something
fully, except this piece of writing presents pleasant understanding even. https://www.halaltrip.com/user/profile/154716/aviatorgame/
If soke one wants to bbe updated with hottest technologoes after that he must be go to see this ssite and bee up to date all the
time. https://sites.google.com/view/the-basics-of-sports-betting/%D0%B3%D0%BE%D0%BB%D0%BE%D0%B2%D0%BD%D0%B0-%D1%81%D1%82%D0%BE%D1%80%D1%96%D0%BD%D0%BA%D0%B0?authuser=2
It is the best time to make some plans ffor the future and it’s
time to be happy. I have read this post and if I could I desire to suggest
you some interesting things or suggestions. Maybe you copuld write next articles referring to this article.
I want to ead more things about it! https://www.flickr.com/people/199676595@N02/
I have been surfing on-line greater than 3 hours as
of late, but I bby no means found any interesting article like yours.
It’s pretty worth enough for me. Personally, if all website owners and bloggers made just right content
as you probably did, the net will be much more usful
thasn evber before. https://linktr.ee/aviatorgame12
Hello! I know this is kind of off topic but I was wondering if you knew where I couod get a captcha plugin for my comment form?
I’m using the same blog platform as yours and I’m having difficulty finding one?
Thanks a lot! https://www.scriptcheats.com/market/entry.php?6117-How-To-Write-An-Email-Introduction
I am reguoar reader, how arre you everybody? This post posted at his weeb site is iin fact good. https://www.backloggd.com/u/casyycloud/
Outstandingg quest there. What occurred after? Thanks! https://forum.pgbu.ir/viewtopic.php?id=555
Thiis weeb site certainly has all thhe ihformation I wanted concerning this
subject andd didn’t know who to ask. https://eythar.org/blog/index.php?entryid=484905
Hey! Quick question that’s totaally off topic. Do yoou know how
to make your site mobile friendly? My website looks weird
when viewing from my iphone. I’m trying to find a template or plugin that miht be able to correct
this issue. If yyou have any recommendations, please share.
Witth thanks! https://dev2.emathisi.gr/blog/index.php?entryid=396
continuously i used to read smaller articles oor reviews
that as well clear their motive, and that is also happening with thjs piece of writing which I am reading at this time. https://eythar.org/blog/index.php?entryid=484832
you’re in realityy a good webmaster. The site loading speed is incredible.
It seems that you’re doing any unique trick.
Moreover, The contents are masterwork. you have donee a fantastic job oon this topic! http://demo.qkseo.in/viewtopic.php?id=834506
Appreciate this post. Let me try it out. https://worldaid.eu.org/discussion/profile.php?id=63935
Hello friends, its impreessive post regarding teachingand completely explained, keep it up all the
time. https://srv495809.hstgr.cloud/blog/index.php?entryid=244
Heya i’m for tthe firest time here. I came across this board and I
find It really useful & it helped mme out a lot. I hope to give something back and help others like you aided me. http://another-ro.com/forum/viewtopic.php?id=407634
Полностью трендовые новинки модного мира.
Абсолютно все мероприятия известнейших подуимов.
Модные дома, торговые марки, haute couture.
Новое место для модных людей.
https://donnafashion.ru/
Gates of Olympus 1000 на реальные деньги
I am really pleased to glance at this weblog posts
which includes plenty of useful information, thanks for providing such data.
canadian pharmacy prices: canadian pharmacy 24 com – canadian pharmacy online
mexican border pharmacies shipping to usa mexico pharmacies prescription drugs mexican rx online
한국야동
online shopping pharmacy india: cheapest online pharmacy india – top 10 online pharmacy in india
https://canadapharmast.online/# legitimate canadian online pharmacies
buying prescription drugs in mexico online: mexico pharmacy – mexican pharmaceuticals online
canadian family pharmacy best rated canadian pharmacy canadian drugs pharmacy
world pharmacy india: buy medicines online in india – top 10 pharmacies in india
top 10 pharmacies in india: online shopping pharmacy india – best india pharmacy
Thank you for another informative blog. The place else may I am getting that type of info written in such a perfect manner?
I’ve a mission that I am simply now running on, and I have been at the glance ouut for suchh information. https://scrapbox.io/icelands/Online_Casinos_for_Iceland
Very soon this website will be famous amid all blogging visitors, due
to it’s pleasant posts https://icelandbets.wordpress.com/
purple pharmacy mexico price list: mexico pharmacies prescription drugs – mexican mail order pharmacies
https://canadapharmast.com/# best canadian pharmacy online
Абсолютно важные новости мира fashion.
Актуальные события лучших подуимов.
Модные дома, бренды, высокая мода.
Новое место для трендовых людей.
https://mvmedia.ru/novosti/282-vybiraem-puhovik-herno-podrobnyy-gayd/
real canadian pharmacy canadian pharmacy best rated canadian pharmacy
canadianpharmacyworld: reputable canadian pharmacy – onlinecanadianpharmacy 24
mexico pharmacies prescription drugs: purple pharmacy mexico price list – mexican mail order pharmacies
india online pharmacy: pharmacy website india – online shopping pharmacy india
https://foruspharma.com/# mexican pharmaceuticals online
medication from mexico pharmacy: buying prescription drugs in mexico online – medication from mexico pharmacy
best online pharmacies in mexico: medication from mexico pharmacy – medicine in mexico pharmacies
http://paxloviddelivery.pro/# paxlovid for sale
doxycycline uk: doxycycline 50 mg price – can you buy doxycycline over the counter uk
http://doxycyclinedelivery.pro/# doxycycline order online uk
https://amoxildelivery.pro/# buy amoxicillin online no prescription
buy ciprofloxacin over the counter: buy cipro online without prescription – cipro
http://amoxildelivery.pro/# where can i get amoxicillin 500 mg
paxlovid pharmacy: buy paxlovid online – Paxlovid over the counter
https://amoxildelivery.pro/# buying amoxicillin in mexico
http://paxloviddelivery.pro/# Paxlovid buy online
doxycycline 100mg over the counter: doxycycline hyclate 100mg – buying doxycycline online in usa
http://amoxildelivery.pro/# can i buy amoxicillin over the counter
https://paxloviddelivery.pro/# paxlovid india
doxycycline 400 mg brand name: cheapest 40 mg doxycycline – doxycycline 50 mg price
https://ciprodelivery.pro/# cipro 500mg best prices
can i order cheap clomid tablets: how can i get clomid without a prescription – where to buy cheap clomid without insurance
amoxicillin 500 mg price: amoxicillin 250 mg capsule – amoxicillin 500 mg without prescription
Always a pleasure to read your well-crafted articles Thank you from IDProperticom!
Как не допустить повторения номеров в тексте, Полезные советы по предотвращению дубликатов номеров, Что такое дубликаты номеров и как их избежать, Полезные рекомендации по пронумерации документов, Зачем важно избегать дубликатов номеров, Какие ошибки приводят к дубликатам номеров, Примеры правильной нумерации, Способы проверить наличие повторений номеров, Полезные рекомендации по исправлению дубликатов номеров, Что делать, если вы обнаружили дубликаты номеров, Полновесные рекомендации по избежанию дубликатов номеров в публикациях, Правила нумерации для избежания дубликатов номеров, Советы по умной нумерации для предотвращения повторений, Советы по ведению правильной истории номеров, Опасности повторения номеров в документах, Полезные инструменты для автоматического обнаружения дубликатов номеров, Практические способы предотвращения дубликатов номеров, Как защитить свои тексты от дублирования номеров, Техники предотвращения повторений номеров.
номера автомобилей изготовление https://dublikat-nomerov.ru/ .